Defect life cycle is a cycle which a defect goes through during its
lifetime. It starts when defect is found and ends when a defect is
closed, after ensuring it’s not reproduced. Defect life cycle is related
to the bug found during testing.
The bug has different states in the Life Cycle. The Life cycle of the bug can be shown diagrammatically as follows:
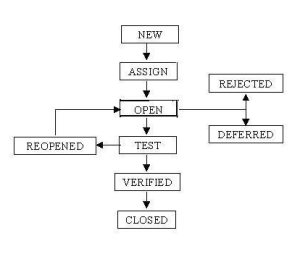
Bug or defect life cycle includes following steps or status:
Nevertheless, the life cycle in general resembles the following:
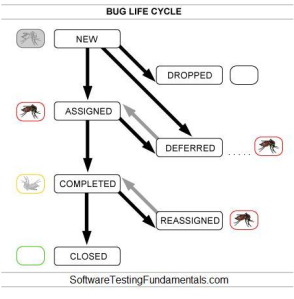
Defect Status Explanation
The bug has different states in the Life Cycle. The Life cycle of the bug can be shown diagrammatically as follows:

Bug or defect life cycle includes following steps or status:
- New: When a defect is logged and posted for the first time. It’s state is given as new.
- Assigned: After the tester has posted the bug, the lead of the tester approves that the bug is genuine and he assigns the bug to corresponding developer and the developer team. It’s state given as assigned.
- Open: At this state the developer has started analyzing and working on the defect fix.
- Fixed: When developer makes necessary code changes and verifies the changes then he/she can make bug status as ‘Fixed’ and the bug is passed to testing team.
- Pending retest: After fixing the defect the developer has given that particular code for retesting to the tester. Here the testing is pending on the testers end. Hence its status is pending retest.
- Retest: At this stage the tester do the retesting of the changed code which developer has given to him to check whether the defect got fixed or not.
- Verified: The tester tests the bug again after it got fixed by the developer. If the bug is not present in the software, he approves that the bug is fixed and changes the status to “verified”.
- Reopen: If the bug still exists even after the bug is fixed by the developer, the tester changes the status to “reopened”. The bug goes through the life cycle once again.
- Closed: Once the bug is fixed, it is tested by the tester. If the tester feels that the bug no longer exists in the software, he changes the status of the bug to “closed”. This state means that the bug is fixed, tested and approved.
- Duplicate: If the bug is repeated twice or the two bugs mention the same concept of the bug, then one bug status is changed to “duplicate“.
- Rejected: If the developer feels that the bug is not genuine, he rejects the bug. Then the state of the bug is changed to “rejected”.
- Deferred: The bug, changed to deferred state means the bug is expected to be fixed in next releases. The reasons for changing the bug to this state have many factors. Some of them are priority of the bug may be low, lack of time for the release or the bug may not have major effect on the software.
- Not a bug: The state given as “Not a bug” if there is no change in the functionality of the application. For an example: If customer asks for some change in the look and field of the application like change of colour of some text then it is not a bug but just some change in the looks of the application.
Nevertheless, the life cycle in general resembles the following:

| Status | Alternative Status |
| NEW | |
| ASSIGNED | OPEN |
| DEFERRED | |
| DROPPED | REJECTED |
| COMPLETED | FIXED, RESOLVED, TEST |
| REASSIGNED | REOPENED |
| CLOSED | VERIFIED |
- NEW: Tester finds a defect and posts it with the status NEW. This defect is yet to be studied/approved. The fate of a NEW defect is one of ASSIGNED, DROPPED and DEFERRED.
- ASSIGNED / OPEN: Test / Development / Project lead studies the NEW defect and if it is found to be valid it is assigned to a member of the Development Team. The assigned Developer’s responsibility is now to fix the defect and have it COMPLETED. Sometimes, ASSIGNED and OPEN can be different statuses. In that case, a defect can be open yet unassigned.
- DEFERRED: If a valid NEW or ASSIGNED defect is decided to be fixed in upcoming releases instead of the current release it is DEFERRED. This defect is ASSIGNED when the time comes.
- DROPPED / REJECTED: Test / Development/ Project lead studies the NEW defect and if it is found to be invalid, it is DROPPED / REJECTED. Note that the specific reason for this action needs to be given.
- COMPLETED / FIXED / RESOLVED / TEST: Developer ‘fixes’ the defect that is ASSIGNED to him or her. Now, the ‘fixed’ defect needs to be verified by the Test Team and the Development Team ‘assigns’ the defect back to the Test Team. A COMPLETED defect is either CLOSED, if fine, or REASSIGNED, if still not fine.
- If a Developer cannot fix a defect, some organizations may offer the following statuses:
- Won’t Fix / Can’t Fix: The Developer will not or cannot fix the defect due to some reason.
- Can’t Reproduce: The Developer is unable to reproduce the defect.
- Need More Information: The Developer needs more information on the defect from the Tester.
- REASSIGNED / REOPENED: If the Tester finds that the ‘fixed’ defect is in fact not fixed or only partially fixed, it is reassigned to the Developer who ‘fixed’ it. A REASSIGNED defect needs to be COMPLETED again.
- CLOSED / VERIFIED: If the Tester / Test Lead finds that the defect is indeed fixed and is no more of any concern, it is CLOSED / VERIFIED. This is the happy ending.
- Make sure the entire team understands what each defect status exactly means. Also, make sure the defect life cycle is documented.
- Ensure that each individual clearly understands his/her responsibility as regards each defect.
- Ensure that enough detail is entered in each status change. For example, do not simply DROP a defect but provide a reason for doing so.
- If a defect tracking tool is being used, avoid entertaining any ‘defect related requests’ without an appropriate change in the status of the defect in the tool. Do not let anybody take shortcuts. Or else, you will never be able to get up-to-date defect metrics for analysis.

